Vaultwarden is a lightweight server implementation of the Bitwarden Client API developed in Rust.
Introduction: What is Vaultwarden?
This open source alternative is specifically designed for self-hosting scenarios where the official Bitwarden servers would be too resource-intensive. Formerly known as ‘bitwarden_rs’, Vaultwarden offers almost complete compatibility with all official Bitwarden clients.
The special thing about Vaultwarden is that it is completely free, requires considerably less system resources than the official Bitwarden server and still supports all important features. It is the perfect solution for tech-savvy individuals, families and small businesses who want to keep their passwords completely under their own control.
Alternative installation methods
In addition to the Docker installation described in detail in this article, there are several other installation options for Vaultwarden:
- Pre-built binaries: Pre-built binaries for various operating systems
- Systemd service: Direct system service without containers
- Third-party packages: Community packages for different distributions (AUR, Homebrew, etc.)
- Source code build: Manual compilation from the Rust source code
- Container alternatives: Podman as a Docker alternative
- Cloud deployments: Kubernetes, Docker Swarm or cloud-specific solutions
In this article, we will focus on the Docker-based installation as it is the easiest to implement and available across platforms. For other installation methods you will find Detailed instructions in the official Vaultwarden Wiki.
Benefits of Vaultwarden
Technical advantages
- Low resource consumption: Significantly less RAM and CPU consumption than the official Bitwarden server
- Full compatibility: Works with all official Bitwarden clients (browser extensions, mobile apps, desktop applications)
- Active development: Regular updates and strong community support
- Rust-based: High performance and storage security
- Docker-ready: Easy containerization and deployment
functionality
- Personal Vault (Personal vault)
- Send (Secure file exchange)
- Attachments
- Website icons
- Personal API Key
- organisations
- Two-factor authentication
- Emergency access
- Admin backend
Data protection and security
- Complete data control: All data remains on your own servers
- No dependency on third-party providers: No risk of service failures or data leaks from external providers
- Open source: Transparent code that can be verified by the community
- Compliance-friendly: Ideal for companies with strict data protection requirements
Disadvantages of Vaultwarden
Technical challenges
- Self-hosting required: Requires some technical know-how for installation and maintenance
- Own responsibility: Backups, updates and security must be managed by yourself
- No official support: Support only by community, not by Bitwarden Inc.
- HTTPS Requirement: Web interface only works via HTTPS or localhost
Maintenance effort
- Regular updates: Must be done manually
- Backup management: Requires your own backup strategy
- monitoring: Server monitoring is your own responsibility
Detailed installation instructions
1. Installation on Linux (Ubuntu/Debian)
prerequisites
These steps install all required Docker components for Vaultwarden on an Ubuntu/Debian system, on existing systems with already running Docker this step can be skipped:
# Update system - Ensures that all packages are up to date sudo apt update & & sudo apt upgrade -y # Install Docker - The container platform that runs Vaultwarden sudo apt install -y docker.io docker-compose # Start and activate Docker service - Ensures that Docker starts automatically at startup sudo systemctl start docker sudo systemctl enable docker # Add users to the Docker group - Allows you to execute Docker commands without sudo # IMPORTANT: After this command you have to log off and log back in! sudo usermod -aG docker $USERStep-by-step installation
Step 1: Create directory structure Here we create the folder structure for Vaultwarden and its data:
# Create working directory - Save all configuration files mkdir -p /opt/vaultwarden # Create a data directory - This is where Vaultwarden saves the database and files # IMPORTANT: This directory must be backed up regularly! mkdir -p ./vw-dataStep 2: Create a Docker Compose file The Docker Compose file defines how Vaultwarden is executed:
nano docker-compose.ymlInclude the following content and customize it with #THANKS TO CHANGE Selected values for your environment:
Version: '3.8' services: vaultwarden: image: vaultwarden/server:latest container_name: vaultwarden restart: Unless-stopped environment: # THANKS TO CHANGE: Replace with your own domain or IP address DOMAIN: "https://your-domain.de" # THANKS TO CHANGE: Create a secure admin token (min. 32 characters) # Generate it with: openssl rand -hex 32ls ADMIN_TOKEN: "YourSecureAdminToken123" # Enable WebSocket for live synchronization WEBSOCKET_ENABLED: "true" # SECURITY: After initial setup, set to "false"! SIGNUPS_ALLOWED: "true" volumes: # Persistent data storage - NEVER delete! - ./vw-data/:/data/ ports: # Port mapping: Host port:Container port # 127.0.0.1 only binds to localhost (more secure) - "127.0.0.1:8080:80" - "127.0.0.1:3012:3012"Step 3: Start Vaultwarden This command downloads the Vaultwarden image and starts the container in the background:
# Start container in detached mode (runs in background) docker-compose up -d # Check status - should display "Up" docker-compose ps # View logs (if problems occur) docker-compose logs vaultwarden
Step 4: Configure Nginx Reverse Proxy (optional) A reverse proxy is required for HTTPS and advanced features. Here we install Nginx with automatic SSL certificates:
# Nginx and Certbot for SSL certificates install sudo apt install nginx certbot python3-certbot-nginx # Create Nginx configuration for Vaultwarden sudo nano /etc/nginx/sites-available/vaultwarden
Nginx configuration (adjust ‘your-domain.de’ to your domain):
# HTTP-to-HTTPS forwarding server { list 80; server_name ihr-domain.de; # THANKS TO CHANGE: Your domain return 301 https://$server_name$request_uri; } # HTTPS configuration server { list 443 ssl http2; server_name dein-domain.de; # THANKS TO CHANGE: Your domain # SSL certificate paths (set automatically by Certbot) ssl_certificate /etc/letsencrypt/live/your-domain.de/fullchain.pem; ssl_certificate_key /etc/letsencrypt/live/your-domain.de/privkey.pem; # Main application location / { proxy_pass http://127.0.0.1:8080; proxy_set_header Host $host; proxy_set_header X-Real-IP $remote_addr; proxy_set_header X-Forwarded-For $proxy_add_x_forwarded_for; proxy_set_header X-Forwarded-Proto $scheme; } # WebSocket connections for live sync location /notifications/hub { proxy_pass http://127.0.0.1:3012; proxy_set_header Upgrade $http_upgrade; proxy_set_header Connection "upgrade"; } }
Step 5: Create an SSL certificate and activate Nginx
# Enable Nginx page sudo ln -s /etc/nginx/sites-available/vaultwarden /etc/nginx/sites-enabled/ # Test Nginx configuration sudo nginx -t # Create SSL certificate (replace "your-domain.de") sudo certbot --nginx -d ihr-domain.de # Start Nginx and enable automatic start sudo systemctl enable nginx sudo systemctl restart nginx
Thus, the installation under Linux is already complete, Continue to the Configuration section.
2. Installation on Windows
prerequisites
- Docker Desktop for Windows download and install from: https://docs.docker.com/desktop/windows/install/
- Git for Windows install (optional, for easier management)
Step-by-step installation
Step 1: Create working directory**
The Windows file system requires slightly different paths than Linux, please don't forget to adjust them accordingly:
:: Create working directory on drive D mkdir D:\vaultwarden cd D:\vaultwarden :: Create data directory for persistent storage :: IMPORTANT: Backup this directory regularly! mkdir vw-data
Step 2: Create a Docker Compose file Creates a file called docker-compose.yml (with an editor like Notepad++ or VS Code):
Important adjustments for Windows:
Version: '3.8' services: vaultwarden: image: vaultwarden/server:latest container_name: vaultwarden restart: Unless-stopped environment: # For local Windows installation - change DOMAIN for external use: "http://localhost:8080" # THANKS TO CHANGE: Generate secure admin token # PowerShell: -join ((1..32) ⁇ ForEach {'{0:X}' -f (Get-Random -Max 16)}) ADMIN_TOKEN: "YourSecureAdminToken123" WEBSOCKET_ENABLED: "true" # Set to "false" after initial setup! SIGNUPS_ALLOWED: "true" volumes: # Windows path syntax with forwardslash - ./vw-data/:/data/ ports: # Localhost Binding for Local Use - "127.0.0.1:8080:80" - "127.0.0.1:3012:3012"Step 3: Start Vaultwarden Now open the PowerShell or Command Prompt as administrator in the Vaultwarden directory:
:: Start container (automatically downloads image) docker-compose up -d :: Check status - should display "Up" docker-compose ps :: In case of problems: View logs docker-compose logs vaultwardenStep 4: Configure Windows Firewall (optional) If you want to make your new Vaultwarden available on the network:
:: Create firewall rule for port 8080 netsh advfirewall firewall add rule name="Vaultwarden" dir=in action=allow protocol=TCP localport=8080Step 5: Create Windows Service (optional) For automatic start with Windows, for example, use the NSSM (Non-Sucking Service Manager):
- Download NSSM: https://nssm.cc/download and unpack
- Create a service (PowerShell as Administrator):
# Adjust NSSM path cd C:\nssm-2.24\win64 # Install service .\nssm.exe install VaultwardenService # Set Executable (Docker Desktop must be installed) .\nssm.exe set VaultwardenService Application "C:\Program Files\Docker\Docker\Docker Desktop.exe" # Set working directory .\nssm.exe set VaultwardenService AppDirectory "C:\vaultwarden" # Start delay (so that Docker Desktop starts first) .\nssm.exe set VaultwardenService AppExit Default Restart .\nssm.exe set VaultwardenService DependOnService Docker Desktop Service # Start service .\nssm.exe start VaultwardenServiceThis also completes the installation on Windows, Continue to the Configuration section.
3. Installation on macOS
prerequisites
# Install Homebrew (if not already available) /bin/bash -c "$(curl -fsSL https://raw.githubusercontent.com/Homebrew/install/HEAD/install.sh)" # Docker install brew install --cask docker # Start Docker Desktop open /Applications/Docker.appStep-by-step installation
Step 1: Create working directory macOS uses Unix-like path structures, therefore similar to Linux:
# Create working directory in the home directory mkdir -p ~/vaultwarden cd ~/vaultwarden # Create a directory for Vaultwarden data # IMPORTANT: Backup regularly - all passwords are stored here! mkdir vw-dataStep 2: Create a Docker Compose file Uses a text editor such as nano, vim or TextEdit:
# Create file with nano (recommended for terminal use) nano docker-compose.ymlmacOS-specific configuration:
Version: '3.8' services: vaultwarden: image: vaultwarden/server:latest container_name: vaultwarden restart: Unless-stopped environment: # For local use - change domain for external use DOMAIN: "http://localhost:8080" # THANKS TO CHANGE: Generate secure token # Terminal: openssl rand -hex 32 ADMIN_TOKEN: "YourSecureAdminToken123" WEBSOCKET_ENABLED: "true" # Disable after setup for security reasons! SIGNUPS_ALLOWED: "true" # macOS specific: Set Timezone TZ: "Europe/Berlin" volumes: # macOS path (Tilde is not supported by Docker, hence relative path) - ./vw-data/:/data/ ports: # Localhost binding for security - "127.0.0.1:8080:80" - "127.0.0.1:3012:3012"Step 3: Start Vaultwarden
# Start containers in the background docker-compose up -d # Check status (should show "up" and "healthy") docker-compose ps # Check logs for problems docker-compose logs -f vaultwardenStep 4: Configure macOS Firewall (optional) If macOS Firewall is enabled:
# Check current firewall status sudo /usr/libexec/ApplicationFirewall/socketfilterfw --getglobalstate # Allow incoming connection dockers sudo /usr/libexec/ApplicationFirewall/socketfilterfw --add /Applications/Docker.app/Contents/MacOS/Docker sudo /usr/libexec/ApplicationFirewall/socketfilterfw --unblockapp /Applications/Docker.app/Contents/MacOS/DockerStep 5: Automatic startup with macOS (LaunchAgent) To automatically start Vaultwarden at startup, a LaunchAgent file is created:
# Create LaunchAgent directory (if not available) mkdir -p ~/Library/LaunchAgents # Create LaunchAgent file nano ~/Library/LaunchAgents/com.vaultwarden.plistLaunchAgent configuration (customize the username):
<?xml version="1.0" encoding="UTF-8"?> <!DOCTYPE plist PUBLIC "-//Apple//DTD PLIST 1.0//EN" "http://www.apple.com/DTDs/PropertyList-1.0.dtd"> <plist version="1.0"> <dict> <key>Label</key> <string>com.vaultwarden</string> <key>ProgramArguments</key> <array> <!-- ZWINGEND Path to docker-compose (which docker-compose) --> <string>/usr/local/bin/docker-compose</string> <string>up</string> <string>-d</string> </array> <key>WorkingDirectory</key> <!--- Enter your username --> <string>/Users/yourusername/vaultwarden</string> <key>RunAtLoad</key> <true/> <key>KeepAlive</key> <false/> <key>StandardOutPath</key> <string>/tmp/vaultwarden.stdout</string> <key>StandardErrorPath</key> <string>/tmp/vaultwarden.stderr</string> </dict> </plist>Activate LaunchAgent:
# LaunchAgent load and activate launchctl load ~/Library/LaunchAgents/com.vaultwarden.plist # Check status launchctl list ⁇ grep vaultwarden # In case of changes: Reload LaunchAgent launchctl unload ~/Library/LaunchAgents/com.vaultwarden.plist launchctl load ~/Library/LaunchAgents/com.vaultwarden.plistStep 6: Homebrew integration (optional) For even cleaner macOS integration, you can use Homebrew services:
# Installing homebrew services (if not available) brew tap homebrew/services # Create simple wrapper service brew services start docker # Alternatively: Start vaultwarden directly via Docker command alias vaultwarden-start="cd ~/vaultwarden && docker-compose up -d" alias vaultwarden-stop="cd ~/vaultwarden && docker-compose down" alias vaultwarden-logs="cd ~/vaultwarden && docker-compose logs -f" # Save aliases permanently in .zshrc or .bash_profile echo 'alias vaultwarden-start="cd ~/vaultwarden && docker-compose up -d"' >> ~/.zshrc echo 'alias vaultwarden-stop="cd ~/vaultwarden && docker-compose down"' >> ~/.zshrc echo 'alias vaultwarden-logs="cd ~/vaultwarden && docker-compose logs -f" >> ~/.zshrcAnd zack, that's how fast it can go. Installation completed. Now let's take a look at the setup in detail in the next section.
Advanced configuration and management
First steps: The admin panel
The admin panel is the central management interface for your new Vaultwarden server:
- accessing: Navigate to
https://domain.de/admin(orhttp://localhost:8080/adminwith local setup only) - authentication: Enter the admin token you defined in the Docker Compose file
- Important initial settings:
- SMTP configuration: Required for email notifications and 2FA by email
- Domain settings: Must match your actual URL
- User registration: After initial setup please deactivate for security reasons! (You can invite anyway)
- Backup paths: Define directories for automatic backups
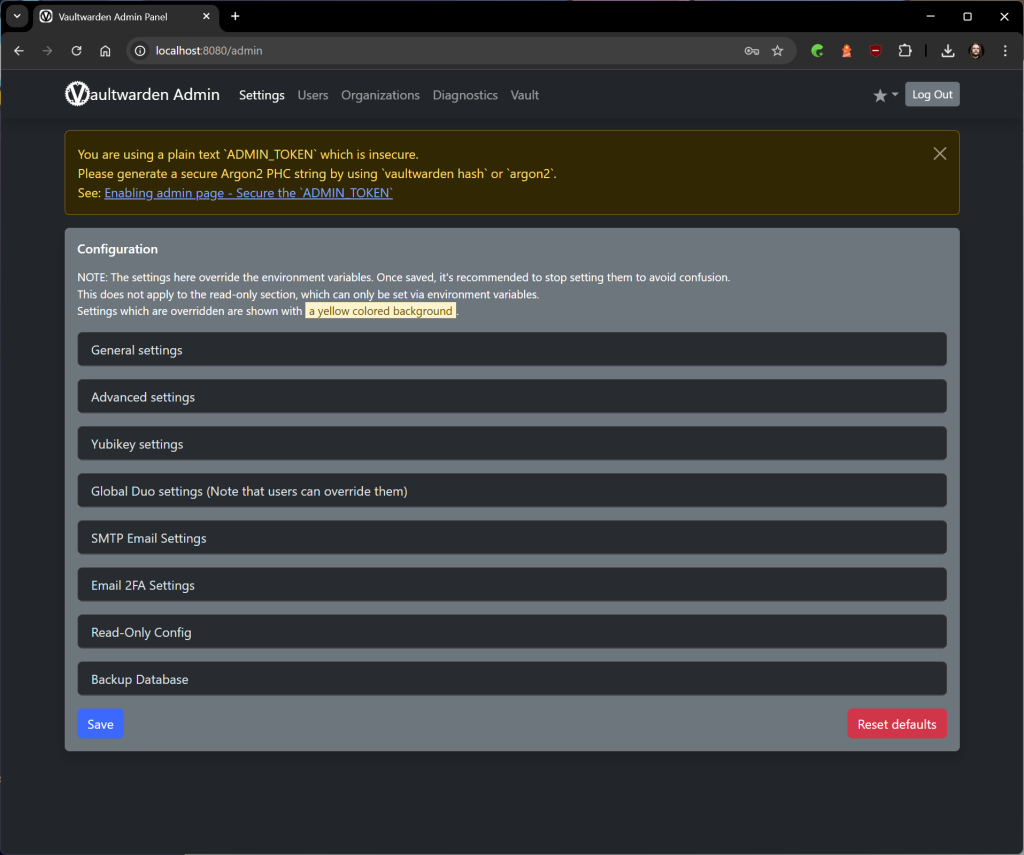
A few more sentences about the error message regarding the admin_token displayed in yellow above:
Security is the be-all and end-all, especially when it comes to sensitive things like your new password manager. For a long time it was ADMIN_TOKEN in Vaultwarden only available in plain text, not the safest solution, as we all know. Don't worry, this is over! Since version 1.28.0+ you can hash the token properly and thus make your instance even more secure.
Why would you do that?
Imagine that someone has access to your config.json or your environment variables. If the ADMIN_TOKEN This person has immediate admin access to your Vaultwarden server. With a hashed token, this is virtually impossible, since the original password cannot be reconstructed from the hash. Great, isn't it?
Vaultwarden now uses Argon2, a hash algorithm specifically designed for password encryption and considered to be very secure. A hashed token is called PHC String (Password Hashing Competition).
Okay, and how do I create the hash?
The easiest way to do this is directly via the integrated function of Vaultwarden itself. You have two options:
1. The easy way: vaultwarden hash
Vaultwarden comes with its own little tool that gives you the PHC String generated. The best thing about it? There are two presets: the Bitwarden defaults and the OWASP recommendations. The OWASP recommendations are the safest of the two, but both are a significant improvement to plain text.
To create the hash, simply enter the appropriate command. I assume that you run Vaultwarden as described above in the Docker and call the container vwcontainer, Just replace it with the name of your container.
With Bitwarden Defaults (default):
# or alternatively directly via the binary:docker exec -it vwcontainer /vaultwarden hash./vaultwarden hash
With OWASP recommendations (recommended):
# or alternatively directly via the binary:docker exec -it vwcontainer /vaultwarden hash --preset owasp./vaultwarden hash --preset owasp
The command asks you twice for a password and then spits the finished PHC String off. You simply copy it into your configuration.
Important: If you have already saved your settings via the admin interface, the environment variables are ignored. Then you must also update the password via the admin interface!
2. The DIY Way: argon2 CLI
If you prefer to take it into your own hands, you can also argon2-CLI Use tool that is available on most Linux distributions. Here you have to specify the parameters for the Bitwarden or OWASP settings manually.
With Bitwarden Defaults:
echo -n "YourMegaSecretPassword" ⁇ argon2 "$(openssl rand -base64 32)" -e -id -k 65540 -t 3 -p 4With OWASP recommendations:
echo -n "YourMegaSecretPassword" ⁇ argon2 "$(openssl rand -base64 32)" -e -id -k 19456 -t 2 -p 1Simple YourMegaSecretPassword Replace with your desired password. The terminal will give you the PHC String back.
What do I do with the PHC string?
If you have the string, you can use it in your Docker configuration. The easiest way to do this is through environment variables in your docker-compose.yml File. And very importantly: After that, you no longer log in with the token itself, but with your password, which you entered when creating the hash.
Attention: Under no circumstances does it manually process the config.json. This can quickly lead to problems. Instead, it is best to use the admin interface to update the settings.
And if you still see the annoying warning that your token is insecure, then you have either saved the settings once via the admin interface, or the configuration is not quite correct. In this case, check the Documentary on Variable Substitution in Docker-Compose or the tips directly in the Github Vaultwarden Repo.
Ready? That's it, then. This is how easy it is to make your Vaultwarden server a lot more secure.
Create the first user
The initial setup of an administrator account:
- registration: Navigate to
https://domain.de(main page) - Create an account: Click on "Create account" – this will only work if
SIGNUPS_ALLOWED: "true"is set - Secure login details:
- Uses a valid email address (important for 2FA and recovery)
- Choose a strong, unique master password (at least 12 characters, special characters, numbers)
- E-mail confirmation: If e-mail verification is activated, click on the confirmation link
- Important: After creating the first admin account, you should definitely
SIGNUPS_ALLOWEDon"false"Set it up!

Create organizations and groups
Vaultwarden supports organizations to share passwords in teams or families.
Create an organization:
- Login to the Vaultwarden web interface
- Click on "New organisation" → "Create organisation"
- Names given (e.g. ‘Family Mustermann’ or ‘Company XY’)
- Choose an organization type (family or business)
Activate groups:
Groups must be explicitly enabled in Vaultwarden by an environment variable in the Docker Compose file:
environment: # Enable group functionality ORG_GROUPS_ENABLED: "true"After activation, you can also create groups:
- Select organisation → ‘Manage’ → ‘Groups’
- "New group" → Give names (e.g. "Admins", "Users")
- Define access rights and assign members
Collections and access controls:
Collections organize Vault entries within an organization:
- ‘Manage’ → ‘Collections’ → ‘New Collection’
- Define access rights per group/user:
- Read only: Can view and use passwords
- Read/Write: Can edit entries
- Manage: Full access including deletion
Set up two-factor authentication (2FA/MFA)
Vaultwarden supports various 2FA methods, which should be activated for maximum security.
Supported 2FA methods:
- Email codes: Easiest method, code is sent by email
- TOTP (Time-based OTP): Google Authenticator, Authy, Microsoft Authenticator
- duo: Professional 2FA service with push notifications
- YubiKey: Hardware-based authentication
- FIDO2 WebAuthn: Modern hardware keys (YubiKey 5, SoloKey, etc.)
Set up TOTP (Google Authenticator):
- Account settings → ‘Security’ → ‘Two-step login’
- Select "Authenticator App"
- Scan QR code with Authenticator app
- Enter 6-digit code for confirmation
- Save recovery code safely!
Configure Hardware Key (FIDO2):
Additional environment variables must be set for hardware keys:
environment: # Enable FIDO2 WebAuthn FIDO2_ENABLED: "true" # Domain for FIDO2 (must match your domain exactly) DOMAIN: "https://domain.de"Force 2FA globally (Enterprise feature):
Vaultwarden offers options to force 2FA for all users:
environment: # Disable 2FA Remember function (forces 2FA every time you log in) DISABLE_2FA_REMEMBER: "true" # Enable Organizational Policies ORG_EVENTS_ENABLED: "true"Best practices for security
Secure admin panel exclusively for local access:
environment: # Admin panel only accessible from certain IPs ADMIN_ALLOWED_IPS: "192.168.1.0/24,10.0.0.0/8" # Admin session timeout (in seconds) ADMIN_SESSION_LIFETIME: "3600"Control user registration:
environment: # Disable after setup! SIGNUPS_ALLOWED: "false" # Only invitations from existing accounts allow INVITATIONS_ALLOWED: "true" # Domain whitelist for registrations SIGNUPS_DOMAINS_WHITELIST: "mycompany.de,confidencewuerdig.com"Email configuration for 2FA and invitations:
SMTP settings are essential for email 2FA and user invitations:
environment: # SMTP server (example: Gmail) SMTP_HOST: "smtp.gmail.com" SMTP_FROM: "vaultwarden@ihr-domain.de" SMTP_PORT: "587" SMTP_SECURITY: "starttls" SMTP_USERNAME: "your-email@gmail.com" # App password required at Gmail! SMTP_PASSWORD: "your app password"Log failed login attempts:
environment: # Enable Extended Logging EXTENDED_LOGGING: "true" # Failed logins log LOG_LEVEL: "warning" # Log file (optional) LOG_FILE: "/data/vaultwarden.log"Advanced security features
Configure Emergency Access:
Emergency Access allows trusted people to access your Vault in case of an emergency:
- Account Settings → Emergency Access
- Add a trusted person via e-mail address
- Define waiting time (e.g. 7 days)
- Select access type: ‘Show only’ or ‘Full access’
Vault health reports:
Vaultwarden provides built-in security analysis:
- Weak passwords: Identifies insecure passwords
- Reused passwords: Finds duplicated credentials
- compromised passwords: Checks against HaveIBeenPwned database
- Unsafe websites: Warns against HTTP sites with login data
Fail2Ban for brute force protection:
Linux systems should configure Fail2Ban:
# Fail2Ban install sudo apt install fail2ban # Create vaultwarden filter sudo nano /etc/fail2ban/filter.d/vaultwarden.confFail2Ban configuration:
[Definition] failregex = ^.*Username or password is incorrect\. Try again. IP: <HOST>\. Username:.*$ ignoreregex =# Jail configuring sudo nano /etc/fail2ban/jail.d/vaultwarden.conf[vaultwarden] enabled = true port = 80,443 filter = vaultwarden action = iptables-allports[name=vaultwarden] logpath = /opt/vaultwarden/vw-data/vaultwarden.log maxretry = 3 bantime = 14400 findtime = 14400Monitoring and maintenance
Implement Health Check:
services: vaultwarden: # ... other configurations healthcheck: test: ["CMD", "curl", "-f", "http://localhost:80/alive"] interval: 30s timeout: 10s retries: 3 start_period: 40sSet up log rotation:
environment: # Logs limit LOG_LEVEL: "warning" # Maximum log file size LOG_FILE: "/data/vaultwarden.log"Logrotate configuration:
sudo nano /etc/logrotate.d/vaultwarden/opt/vaultwarden/vw-data/vaultwarden.log { weekly missingok rotate 52 compress notifempty create 644 root root postrotate docker-compose -f /opt/vaultwarden/docker-compose.yml restart vaultwarden endscript }Bitwarden clients and compatible tools
Browser extensions
All official Bitwarden browser extensions work seamlessly with Vaultwarden:
Chrome/Chromium-based browsers
- name: Bitwarden - Free password manager
- Available for: Chrome, Edge, Brave, Vivaldi, Arc, Opera
- installation: Chrome Web Store → Find and install Bitwarden
- Download link: https://chrome.google.com/webstore/detail/bitwarden-free-password-m/nngceckbapebfimnlniiiahkandclblb
Firefox
- name: Bitwarden - Free password manager
- installation: Firefox Add-ons → Find and install Bitwarden
- Download link: https://addons.mozilla.org/firefox/addon/bitwarden-password-manager/
Safari
- name: Bitwarden for Safari
- installation: Mac App Store → Download Bitwarden
- specificity: Requires the desktop app as a base
Browser extension configuration:
After the installation you have to point the extension to your Vaultwarden server:
- Install and open extension
- Click on the Settings icon (gear)
- Change server URL to:
https://domain.de(orhttp://localhost:8080with local setup) - Log in with your Vaultwarden credentials
Mobile apps
Android
Several options are available here:
Official Bitwarden app:
- name: Bitwarden Password Manager
- Download: Google Play Store
- link: https://play.google.com/store/apps/details?id=com.x8bit.bitwarden
- Features: Full integration, Autofill service, Biometric unlocking
F-Droid alternative:
- name: Bitwarden (open source)
- Download: F-Droid repository
- advantage: Fully open source, no Google services required
iOS/iPadOS
- name: Bitwarden Password Manager
- Download: Apple app store
- link: https://apps.apple.com/app/bitwarden-password-manager/id1137397744
- Features: iOS integration, Face ID/Touch ID, AutoFill provider, Apple Watch support
Configuration of mobile apps:
- Install and open the app
- When registering, tap Self-hosted or Enterprise
- Enter server URL:
https://domain.de - Sign in with Vaultwarden account
- Enable biometric unlocking in the app settings (recommended)
Desktop applications
Windows
- Download: https://bitwarden.com/download/
- Available formats: .exe-Installer, Microsoft Store, Chocolatey, Winget
- Installation via Winget:
winget install Bitwarden.Bitwarden
macOS
- Download: Mac App Store or directly from bitwarden.com
- Installation via Homebrew:
brew install --cask bitwarden - Features: Touch ID integration, Safari extension integration
Linux
Multiple installation options available:
- AppImage: Universally operable on all distributions
- .deb package: For Debian/Ubuntu-based systems
- Snap:
snap install bitwarden - Flatpak:
flatpak install flathub com.bitwarden.desktop - AUR (Arch Linux):
yay -S bitwarden
Command Line Interface (CLI)
The Bitwarden CLI is also a powerful tool for automation and scripting:
Installation:
# Via npm (Node.js required) npm install -g @bitwarden/cli # Via Snap snap install bw # Via Chocolatey (Windows) choco install bitwarden-cliConfiguration and usage:
# Configuring servers bw config server https://her-domain.de # Log in bw login your-email@domain.de # Unlock vault (returns session tokens) export BW_SESSION=$(bw unlock --raw) # List items bw list items # Retrieve password for specific site bw get password github.com # Create new entry bw create item '{"type":1,"name":"example","login":{"username":"test@example.com","password":"secret password"}}'Backup strategies
Automatic backup script (Linux/macOS)
#!/bin/bash BACKUP_DIR="/backup/vaultwarden" DATE=$(date +%Y%m%d_%H%M%S) # Create backup directory mkdir -p $BACKUP_DIR # Container stop docker-compose stop vaultwarden # Backing up data tar -czf $BACKUP_DIR/vaultwarden_backup_$DATE.tar.gz ./vw-data/ # Start container docker-compose start vaultwarden # Delete old backups (older than 30 days) find $BACKUP_DIR -name "vaultwarden_backup_*.tar.gz" -mtime +30 -deleteSet up this script as a cronjob:
# Edit crontab crontab -e # Daily backup at 2:00 o'clock 0 2 * * * /path/to/backup-script.shSafety recommendations
1. Strong authentication
- Always uses complex admin tokens
- It is also best to enable two-factor authentication for all accounts
- Disables registration after setup and invites users instead
2. Network security
- Always uses HTTPS in production
- Restricts access via firewall rules
- Implements fail2ban for brute force protection
3. System updates
# Regular updates of the container docker-compose pull docker-compose up -d # System updates sudo apt update && sudo apt upgradeTroubleshooting
Common problems and solutions
Problem: Web interface does not load
# Check container logs docker-compose logs vaultwarden # Check port conflicts netstat -tulpn ⁇ grep :8080Problem: Browser extension does not connect
- Checks the server URL in the extension settings
- Ensures that HTTPS is enabled (except for localhost)
- Checks firewall settings
Problem: Email does not work
- Check SMTP settings in the admin panel
- Check logs for SMTP authentication errors
- Use email provider-specific app passwords
conclusion
Vaultwarden is an excellent alternative for anyone who wants to fully control their password management themselves. With low resource consumption and full compatibility with all Bitwarden clients, it provides a professional solution for private and small businesses.
The one-time setup requires technical understanding, but the long-term benefits in terms of data protection, control and cost savings more than make up for the effort. With the provided installation instructions and safety recommendations, nothing stands in the way of a successful self-hosting setup.
Important note: Never forget to make regular backups and keep your installation up to date. With such a setup, the security of your passwords is entirely your responsibility!
Further resources
- Official Vaultwarden wiki: https://github.com/dani-garcia/vaultwarden/wiki
- Bitwarden Client / Addons / Download: https://bitwarden.com/download/
- Community support: https://matrix.to/#/#vaultwarden:matrix.org
- GitHub Issues: https://github.com/dani-garcia/vaultwarden/issues
- Docker hub: https://hub.docker.com/r/vaultwarden/server
This article has been compiled with information from the official Vaultwarden documentation and community experiences. Status: August 2025