Software reinstallation: OS
So now we come to the second part of the crafting lesson, the software.
Now you could make it easy and work with the standard CD/DVD installation which was in the delivery state. Then you get at the good piece either Snow Leopard or Lion. The highest feeling of update without working with bootloader or other tricks is on such a device then High Sierra. So I'd say let's try it at the beginning.
Easier said than done I had to find out, because the installation files you get without Mac actually Officially not the links are ‘empty’. Meh! Then there is the idea just not in the Apple Store but from other source to load, which the installation but funny notices and then acknowledges the service with ‘Nö, because -from unknown source’ Meh! Well, then official Apple download link but on a PC Loading? Yes, that's possible. It's great. And then pack on a bootstick? Also that I'm leaving. YAY!
Does the good piece start on the Mac? Nö – at least not on its own. To select the drive when booting, please hold down the Command key / ALT key when booting up. By the way, you will find all the other helpful combinations under this link.
My favorite thing about Intel Macs: Key combination Option + Command + P + R for the NVRAM Reset. Especially helpful if it depends on the boat selection during the installation for inexplicable reasons.
So here again the most important information summarized:
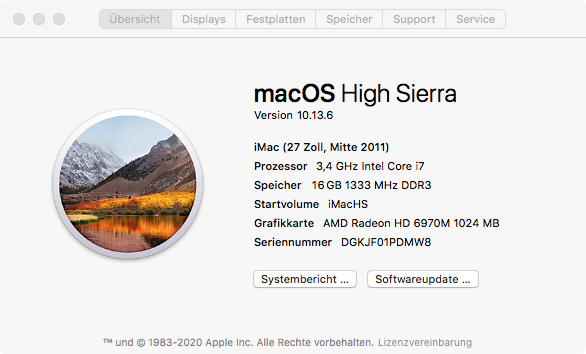
Understand macOS compatibility The iMac Mid 2011 supports a maximum of macOS High Sierra (10.13.6). Newer versions are officially not compatible, although there are unofficial patches (Currently Top Deer OCLP with Detailed instructions or rEFInd / Clover), but apparently both are no longer widely used. However, for the applications that are still supposed to run in this way, High Sierra is completely sufficient.
Installation process: After the hardware upgrade, a complete reinstallation is recommended. First, create a bootable USB stick with macOS High Sierra. If this is not possible, the iMac also supports Internet Recovery, which requires a stable Internet connection.
The hard drive should be completely erased with Disk Utility and formatted with GUID partition table. This ensures the best compatibility and performance.
Software reinstallation: apps
macOS Compatibility, Part 2 Since macOS High Sierra (10.13.6) is the highest of the ‘official’ feelings, the choice of one or the other software is also limited. Newer versions are not officially compatible, but you can usually find older versions as well. However, High Sierra is compatible for the common applications that you run on such an old system.
Safety note: Such an old system should no longer be your daily driver, there have been no security updates for a long time and even if it is a Mac that is generally less in the focus of attackers with MacOS, you do not have to force it. Surfing, emailing or even setting up services that are then available on the Internet, please make your on more up-to-date hardware.
At one point you can see the problems very quickly. The browser that comes with High Sierra has in spite of all available updates according to operating system version 10.13.6 and browser version 13 of Safari from 2019 with the The last patches of 2020 At the end of his life and is now in 2025 of course old iron. He no longer recognizes current certificates, old ones have long since expired, etc...
Installation process: Applications are usually offered in the Apple App Store or downloaded directly from the respective manufacturer as a .dmg image file. They will then install the corresponding .app – so far so chic.
As already mentioned above, however, you have to do without one or the other latest version and search the network for previous installation. For example, Plexamp is to 4.8.4 On High Sierra, newer versions also require a newer OS.
I also have VLC. tried, Installation and function pleasingly uncomplicated and everything available as usual.
Safety note 2: Again, if you don't get the program version from the manufacturer, it can basically be something that ends up on the computer. Again, caution is advised, swarm intelligence and / or Google is required and a little mistrust is advised.
Performance optimizations after installation
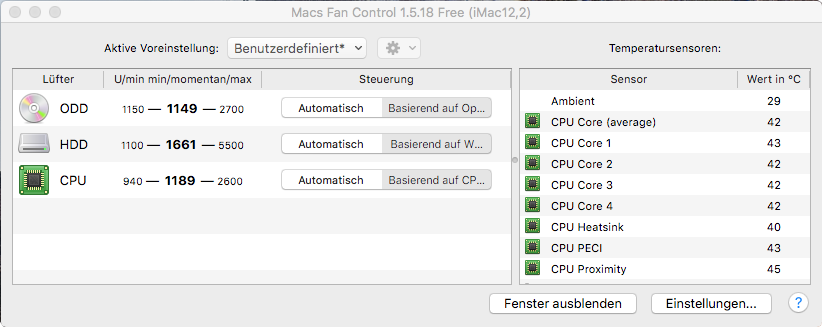
Set up temperature monitoring After an SSD upgrade, installing fan control software is essential. Programs such as TG Pro or Mac's Fan Control make it possible to control the fan speed based on the CPU temperature, as the original hard disk temperature sensor is no longer present.
Since it is self-explanatory and almost like a CallofDuty level knows only one path, I spare you details and limit myself to a clear understandable ‘run’.
However, there are also alternatives for this, one requires swarm intelligence, one couple of bills, these Cables and plugs, the other one a soldering iron and a SMD Building Block.
System updates and software Install all available system updates and make sure your software is compatible with High Sierra. Many modern applications have discontinued support for older macOS versions.
conclusion
If I had prepared a little better, it would probably have taken less than half a day to get both the operating system and applications to an acceptable usable level.
But since I'm going on it for the first time and therefore have hung out accordingly, it has become instead of a half rather 2 and a half until the basic functionality was at the start. ⁇
Next time, it'll... probably be just like that.
But you can still dream.